
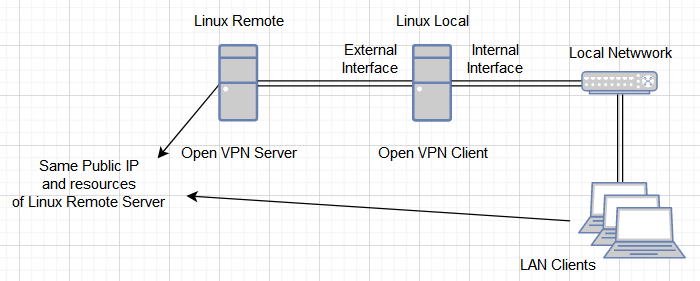
A machine in the middle between a VPN server and a Local Network, acting as a client for the VPN server (on the external interface) and as a Router for the Local Network (on the internal interface) is known as “Road Warrior”.
The overall goal is to provide clients on the Local Network transparent communication (plug and play) to the internet obtaining the VPN Server IP and a secure encrypted connection.
Research
This solution can be achieved with professional dedicated firewall software such i.e Pfsense or with dedicated hardware. The first option can be complicated to implement and the second expensive for a small environment.
Here below a third option realized with opensource OS and Software that is a the same time cheap and easy to configure.
Requirements
- OpenVPN software
- Linux servers OS
- VMs (local or on the cloud) / Physical Servers
Design
Implementation
Any Linux distribution will work with minor changes, for the specific implementation below Linux Ubuntu 18 LTS has been used.
Linux Remote Server
The Linux Remote Server can be any linux distro with an OpenVPN Server installed on top
- Install the OpenVPN Server
- Generate a Client certificate
- Test the connectivity with a client either Windows or Linux checking ports and communication is working properly and the VPN tunnel can be established with no issues.
Linux Local Server
New external interface for VPN connection tun0
- Install the server certificate in a folder on the client i.e. the /home/user
- Install the OpenVPN client
Code:
sudo apt update
sudo apt install openvpn
Run the
Code:
sudo apt openvpn certificate.ovpn Typing the command “ip a” a new interface called tun0 should be shown, this is the vpn tunnel established with typically 10.8.0.2 ip address (10.8.0.1 should be remote server).
Internal Interface DHCP Server
- Install dhcp server on the Linux Local Server internal interface in this example ens37
Code:
sudo apt install isc-dhcp-serverNext edit the configuration file:
sudo nano /etc/default/isc-dhcp-server
Find the line INTERFACES=”ens37″ and add the value for the internal nic ens37. Save and exit.
Next edit the config file of the dhcp server
sudo nano /etc/dhcp/dhcpd.conf
Remove defaults and paste the below syntax, adjusting DNS IPs and range with personal config.
option domain-name-servers 8.8.8.8, 8.8.4.4;
option subnet-mask 255.255.255.0;
option broadcast-address 192.168.100.255;
subnet 192.168.100.0 netmask 255.255.255.0 {
range 192.168.100.20 192.168.100.100;
option routers 192.168.100.1;
}
Save and restart the dhcp server
Code:
sudo service isc-dhcp-server restart*Please note the internal interface needs to be setup as gateway and given an IP, for this configuration ens37 interface needs to be setup with 192.168.100.1/24
Enable Routing for IPv4
Edit this file with nano: /etc/sysctl.conf and uncomment to enable routing ipv4
net.ipv4.ip_forward=1
save the file and exit
enable the changes with
Code:
sudo sysctl -p /etc/sysctl.confNAT Config
Network address translation needs to be enabled on the internal interface with the following commands:
Code:
sudo iptables -t nat -A POSTROUTING -o tun0 -j MASQUERADE
sudo iptables -A FORWARD -i tun0 -o ens37 -m state --state RELATED,ESTABLISHED -j ACCEPT
sudo iptables -A FORWARD -i ens37 -o tun0 -j ACCEPT
The changes need to be persisted on the iptables otherwise at the reboot they will be lost.
Code:
sudo apt-get install iptables-persistentTest
At this stage any client connected on the Linux Local Server internal interface should be able to navigate using the Public IP address of the Remote Linux Server.
